Project Details
Type: Client Project
Engine: Unreal Engine 4.17
Platform: PC -HTC VIVE
Team size: 7
Role: Technical Designer
Desctiption
This is a client project where we made in relatively short amount of time a prototype for.
The project was a simulator for investigators to train with.
We made a single scenario highlighting all the tools we made to investigate the crime scene.
Contributions
I worked mainly with David Maris he was the only programmer in the team. He worked mainly on game rules where I worked mainly on the tools to be used in game.
Below I have detailed descriptions what I did for the project.
Mechanics
Whiteboard mechanicsummary
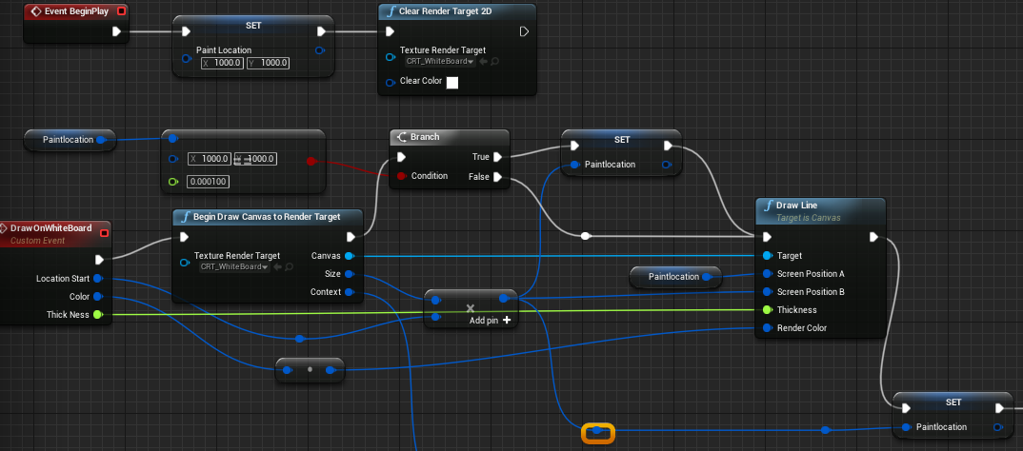
The whiteboard itself a very simple model and a material with a special texture (canvas render target)
Where the markers hit the model draw a line in the canvas render target.
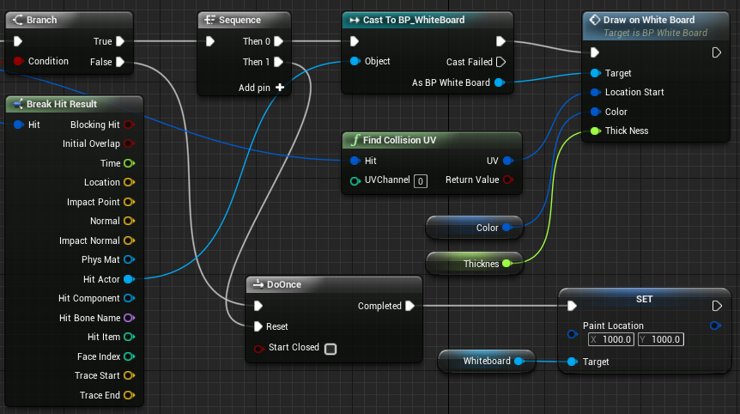
To get the location
I made a short cast from the tip of the marker check if it collides with the whiteboard object
Unreal has a very useful little node find collision UV that tells me what coordinates of where I am hitting the model so need to keep that in mind when UV the model I cheated a little bit with just using a plane place it in inside a frame but you could also just make a separate UV channel. Now I have the location and cast the location, color and thickness (color: is just a set variable thickness: is the calculation based from the length of the raycast) to the whiteboard blueprint where I handle the actual drawing on the canvas render target.
Drawing
The drawing on the canvas render target is done in a custom event that is triggered by the marker getting all the information needed
Inset picture drawline It looks like a smooth curved line you are drawing but they are a lot of very small straight lines
Summary
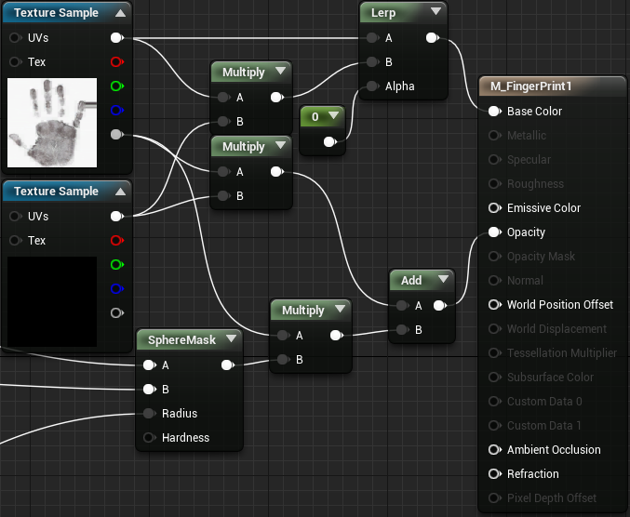
of course, for a VR Crime Scene we needed invisible clues. Invisible to the naked eye so I worked on how I could make them visible with shining a blacklight flashlight on it if I don’t shine on it anymore it will be invisible. For the second part need to make a dust that makes it visible and stays visible.
BlackLight
I made it work with the opacity channel of the “hidden clue” material.
Now to make it appear only where the light shines was tricky, but I settled using a sphere mask.
That gave me the option to also adjust the radius of the sphere mask so I can show determined on how close you are to the object.
I sent a raycast from the flashlight than I use the length to determine how big the radius should be for testing purposes I spawned in a sphere and scaled that with the length of the raycast
Duster
A black light is good to find the clues but to be able to log the evidence it needs to be visible permanantly. I used my newly learned skills from the whiteboard and used a render target and added that to the sphere mask on the opacity layer. The lower texture sample is a render target anything drawn in there will be visible.